

Is there a material more suitable for flooring than wood? It is not the hardest or most durable product, but it has the distinct advantage of being able to be repaired and resurfaced many times, like a slate that can be wiped clean from years of abuse or neglect. The once living wood is still alive because it can be rejuvenated by the careful attention of the wood floor craftsman and happily appreciated by the owner.
CHARACTERISTICS OF A SKILLFULLY SITE FINISHED WOOD FLOOR
THE SANDING PROCESS START TO FINISH
DIFFERENT TYPES OF WOOD FLOOR FINISHES COMPARED
DUSTLESS SANDING
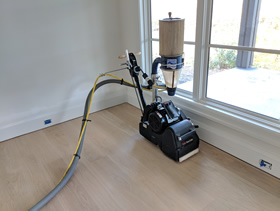
Fast forward to today, market demands have forced the wood flooring industry to adapt to customers' wants and needs, from the equipment and product manufacturers to the contractors performing the work. New machines have since been introduced that have integrated dust collection attached to powerful vacuums with efficient filtration systems to maintain a higher level of indoor air quality as well as low VOC finishes that allow the customer to continue living in the home during the process.
However, no system is 100% dust free. Any existing dust on surfaces will likely be redistributed into the area by the sheer volume of air caused just by running the machines. There are even some processes whereby containment of airborne dust is nearly impossible, such as removal of carpet. Much of it boils down the mindset of those performing the work too. Sloppy and inattentive execution of certain tasks can lead to a dusty mess regardless of the equipment being used.
In the end, a good set of equipment with integrated dust collection combined with the right attitude helps the contractors as much as it helps the homeowners by not creating the mess in the first place, aiding in achieving a finish free of dust and debris. And of course the homeowner can breathe easier knowing they won't have to clean up a mess.
CHARACTERISTICS OF A SKILLFULLY SITE FINISHED WOOD FLOOR
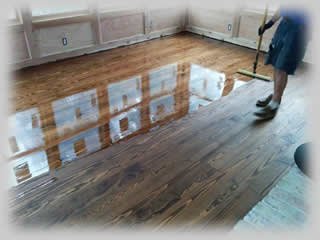
A lot of companies sand wood floors but not very many actually produce a fine finish.
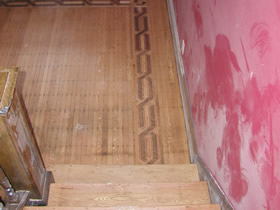
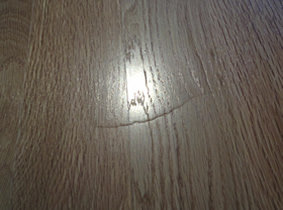
All traces of old finish need to be sanded away for the new stain or sealer to bond properly and for the new finish to look its best. Any unevenness between individual boards must be sanded flush as well to have a nice flat "table top" appearance in the reflection. Then the floor is sanded with the next finer grit to remove the previous coarse scratches, progressing to the point specified by the particular stain or sealer being used. If the floor is final sanded with a grit that is too coarse, the finish will wear on the peaks of the scratches, resulting in a prematurely worn surface. Conversely if the floor is final sanded with a grit that is too fine, the surface of the wood will be too burnished and the finish may not bond properly.
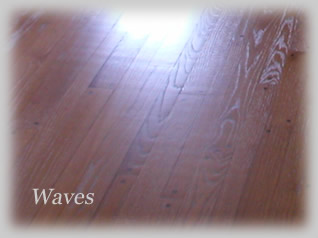
Apart from correcting previous sanding defects, there are a number of common mistakes contractors can make as well. Floor sanding machines are difficult to use, let alone master. Drum stops, dishout, waves, chatter, edger digs or coarse scratches that didn't get sanded out are all too easily overlooked by the novice. It's important to achieve a quality sand job free of these problems, as the only way to correct a sanding defect is to resand the floor.
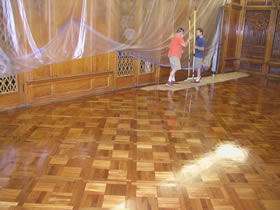
The most common type of flooring is oak, it boasts a good middle of the road hardness rating, sands well and takes a stain nice and evenly. But not all species of wood are as forgiving. Exotic woods and even domestics such as hickory or maple are harder to sand and require a more refined surface, as they tend to show every little sanding or finishing mistake in the final product. Sanding borders, medallions and parquet is challenging because the individual pieces of wood are running in so many directions.
Applying wood floor finish is a specialized process that, apart from proper preparation of the wood surface, requires mastery of technique, knowing the particulars of the finishes available, and management of job site conditions. The primary aspect of wood floor finishing is ensuring that the coatings bond well to the wood surface and to each other. Factors that affect bonding are proper abrasion, adequate dry times, and recommended application rates. A bonding issue may not be initially apparent but will manifest as a durability problem later, possibly with finish flaking or fracturing.
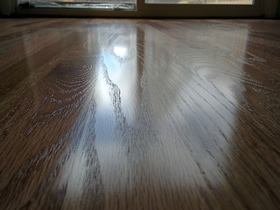
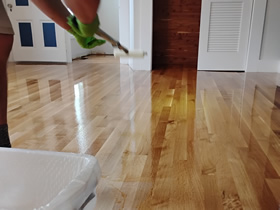
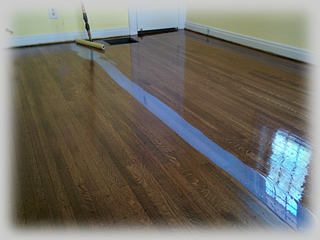
Poor application technique will show in the finish, especially in the reflection. Much like most other aspects of wood flooring, floor finishing is difficult to pull off, and even more difficult to master. Skippers, uneven application, back out marks, drips, puddles, uneven sheen, particulate, hairs, or other debris dried in the finish require the utmost skill and attention to detail to avoid. Most of these issues can be rectified by a spot repair, or in extreme cases coating the entire floor. A skillfully applied finish coat will appear uniform and has a glow that brings out the beauty of the wood and doesn't detract from it with unsightly imperfections.
STAIRCASES AND LANDINGS
content about sanding stairs, idk stuff about risers, balusters, etc.
THE SANDING PROCESS START TO FINISH
- All furniture, rugs, curtains, anything else placed on the floor need to be removed
- Doors, trim such as shoe mold or quarter round are removed and labeled for convenient replacement
- The floor is thoroughly prepped, any protruding nail heads or staples are removed or punched below the surface
- A source of 220v power is needed for our equipment
- The floor is rough sanded with the big machine
- The perimeter is sanded with the buffer
- The perimeter is sanded with the edger
- The corners and casings are scraped flat by hand
- The floor is vacuumed then intermediate sanded with the big machine
- The floor is flattened with the Lagler Trio
- The perimeter is final sanded with the edger
- The floor is vacuumed then final sanded with the big machine
- The corners and casings are scraped again then hand sanded
- The floor is vacuumed then final buffed with the Lagler Trio
- The floor is either final vacuumed and sealed if natural, or vacuumed and final buffed
- The floor is final vacuumed and then stained
- The floor is vacuumed again then sealer is applied
- After an overnight drying period, the floor is abraded, then vacuumed and finish is applied
- After a 3 hour drying period a second and final top coat is applied
- After an overnight drying period the trim is nailed back up and doors reinstalled
- You finally get to enjoy your new hardwood floors
COLOR ENHANCEMENTS
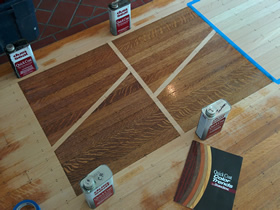
If the natural color of the wood isn't going to mesh well with wall or trim colors in the home, there are color options available that can be blended to an almost infinite number of custom combinations. If that wasn't enough there is a technique used in the wood flooring industry called water popping. A blend of water and denatured alcohol is consistently applied to the surface of the wood just before staining, and allowed to dry completely. This process wicks up the grain and allows the stain pigment to sink deeper into the pores of the wood, giving it a richer color.
DIFFERENT TYPES OF WOOD FLOOR FINISHES COMPARED
Solvent finish
Oil Modified Urethane
Years ago the most common floor finish used was Oil Modified Urethane (OMU), commonly referred to by most people as "polyurethane". It's very forgiving, lays on thick and requires waiting overnight to dry enough for the next coat, which is nice for complicated layouts where longer "open time" is beneficial. It has an amber cast, and continues to turn more and more amber with age. It has an odor similar to that of oil based paint, and generally takes 2 to 4 weeks to fully cure. It is not recommended for the homeowner to stay in the home when this product is used. The finish itself has a thick plastic look, and scores the lowest on the Taber abrasion test.
Conversion varnish
The most common conversion varnish around Indiana, almost legendary, is Glitsa's Bacca sealer and Gold Seal top coat. This finish has the strongest odor, but it's widely regarded as the best. It dries faster than OMU and doesn't have near the open time. It does yellow over time, but not as badly as OMU. Full face organic vapor respirators are a must when working with it. The recommended system has a thin build to accentuate the grain, but an extra coat of sealer can be applied for a high build system. This finish takes 7 days to fully cure.
Waterborne finish
When waterborne products gained in popularity in the 2000s, they had quite the learning curve. They dry so much faster than what contractors were used to that the finisher really had to move fast and be very careful not to overwork the product. They do have a thinner appearance but score higher on the taber abrasion test. These are also the most convenient products from the homeowner's perspective because the fast 2 to 3 hour dry times and (relatively) benign vapors they produce enable the homeowner to continue living in the house during the finishing process. 2 coats can be applied in one day, but if the floor needs to be walked on in the evening then one coat can be applied each morning so that the floor is dry enough to be walked on in socks when the homeowner gets home from work each day.
Isocyanate 2 component
This particular product is similar to epoxy in that there's a part A and a part B that get mixed together and must be used within 4 hours or it begins to harden in the jug. It's a clear finish and doesn't yellow over time like OMU, but it does tend to add something of a slight brown cast over stains. Many of these finishes are fully cured after 3 days.
Aziridine hardened 2 component
The other main 2 component waterborne finish available has a different type of hardener and is a little easier to use. The pot life of the mixed product is a little longer and it's not quite as hard as the isocyanate hardened finish, but it's also not quite as expensive. It can be recatalyzed as well so there is less wasted product.
Single component waterborne
This product has many of the same characteristics of the other waterborne finishes but is an oxygen crosslinking finish that only requires a thorough shaking before being applied. Many single component waterborne finishes do yellow over time. They're less expensive than the 2 component finishes and don't wear as well.