

by Everett 4/25/2020
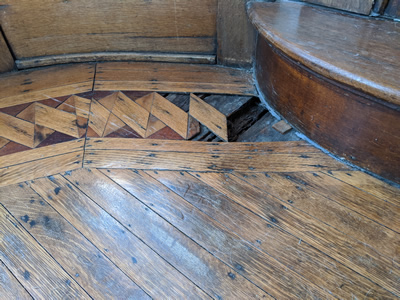
The carpentry work on this job didn’t end with the new floor and border installation, there was some previous moisture damage on the border where it ran around the bay window that needed to be repaired. One potential issue with repairs on hardwood floors is that the damage to the subfloor is sometimes more widespread than the damage seen at the surface. You remove all the rotted floor boards and realize that you need to go back to the next joist to get fresh new plywood in to fix the sub floor, so even more surface wood needs to go even though there may not have been anything wrong with it. I will also have to determine which parts of the old border are salvageable. One thing that we’ve seen a lot in these old borders with mahogany in them is that mahogany is relatively very soft compared to oak or maple, when you sand a border like this the mahogany pieces usually “dish out” more, and end up much thinner than the surrounding pieces. Luckily a lot of this border seems to have some decent life left in it, at least here by this bay window.
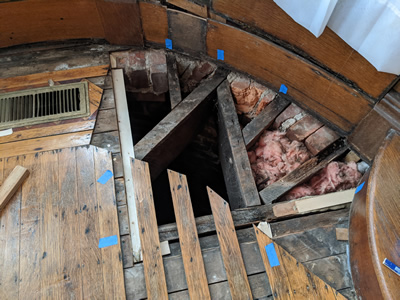
Another issue with this is that the framing for bay windows is usually all out of whack because it’s not part of the normal joist system, it’s kind of “tacked on” so to speak. Over time they end up either sagging or developing a hump which in turn wreaks havoc on the wood floor and makes it very difficult to sand. Unlike some bay windows, this one actually had the foundation under it which is a huge plus, but the framing had settled and caused a hump to appear at the header joist. Without removing all the flooring and subfloor in that area and grinding down the joists that are too high, there’s not much that can be
done about this. The only reasonable recourse we have is to venture down into the crawl space and shim the low spots of the subfloor up to make the humped part more gradual.
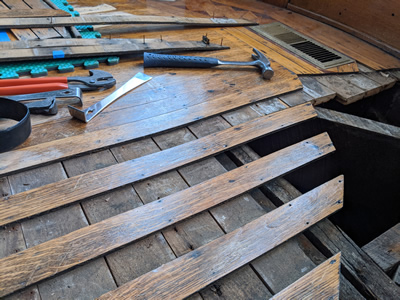
So once that’s taken care of the approach here is to carefully remove only the flooring and border needed to replace the rotted sub floor with new plywood, assess the flooring that was removed in hopes that most of it can be put right back down, then scrape or sand the old subfloor (so that the glue has a good clean surface to bond to), and glue the good flooring down. The framing under the rotted sub floor was in surprisingly good condition so the only framing I had to add was a couple of nailer blocks for my plywood to land on. The plywood piece was a little challenging to cut since part of it was round, but all in all it went smoothly. Then it was time to go ahead and glue down the parts of the original floor that I determined were in good enough condition to reuse. Nailing is kept to a minimum here because using the old nail holes will do nothing, and adding more nail holes than absolutely necessary will be unsightly and could possibly split the boards. When doing a full trowel glue down, the nails are really just an afterthought- all they’re really doing in that case is holding the flooring down until the glue cures.

Because one of the sections of the border was actually missing, that whole spot needed to be replaced. If new wood is used in a repair on an old floor, it sticks out like a sore thumb sometimes even after staining, so we located an old piece of maple flooring and a section of mahogany from an old door. Using old wood isn't always a perfect match but it will be worlds above using brand new wood. Yet another issue at play here is that wood shrinks over time, which is why most old floors have at least some gaps between the boards. This raises some important questions when doing something like this- do you cut the new wood to match the old gaps exactly, knowing that it will possibly shrink in the future and eventually develop way bigger gaps than the original border? Do you cut the pieces so that it has no gaps and let it shrink to hopefully look like the original in maybe 5 to 10 years? It’s impossible to know for sure what the best approach is in each particular case because of all of these variables. I opted to try to find a happy medium by just cutting the pieces using the factory saw settings rather than painstakingly adjusting the saw until it’s cutting a perfect 45* angle. Somehow it all ended up fitting together very tightly, but hopefully after a few seasons of movement no one will even notice it. (Let’s be honest, no one will probably ever notice it anyway, unless they’re as nitpicky as we are haha)
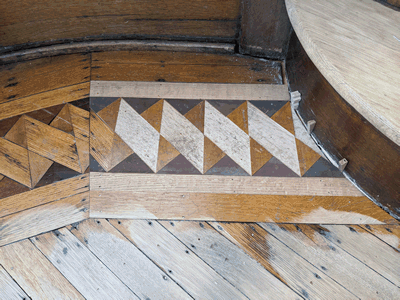
You never know what one of these repairs will look like after you sand it, sometimes the wood you used was tannin stained and you couldn't tell because of the old finish for instance. In this case I had actually used these particular boards before so I knew nothing like that would happen but you still don't know if perhaps they'll have a different tone to them or if they just aged or oxidized differently than the existing floor. The mahogany is near perfect, there are tons of pieces in the old border that look exactly like it. And though the maple didn't look quite as dark as the section next to it, again there were plenty of pieces in the old border that looked just like it. The only real issue as far as color goes is the new red oak. I used some boards that are maybe 10 or 15 years old, so they're not brand new, but they're also not antique. But all in all it matches really well. I'm fairly confident that once the stain goes on, this repair will disappear color wise.