

by Everett 4/5/2017
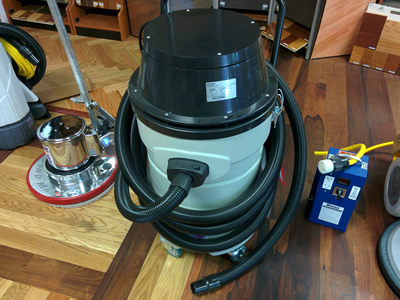
The Ceno 2 motor vacuum is, as the name suggests, a 110v vacuum with 2 independently switched motors, an internal cloth filter and a 1.5” hose. There is also a 220v version with 3 motors that uses the same exact vac body, more on that later. It’s not a bad vacuum for the price, but there are some easy improvements you can make yourself. Personally I felt like the diameter of the hose was a restriction and I never really liked that cloth filter.
2” hose upgrade
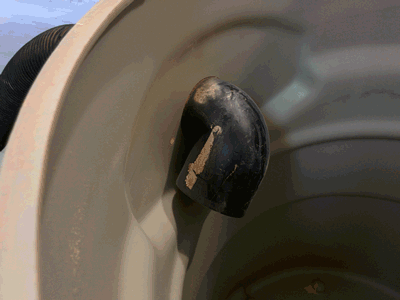
If you remove the hose mount boss off the front of the vac body there’s already a perfect hole for a 2” hose right there. But you’ll notice that on a lot of vacuums there is a 90 degree deflector on the inside to direct the air away from the filter so that it doesn’t get pummeled with dust or perhaps splinters or other filter damaging debris. I was able to find a 90 degree vacuum brush made for Craftsman/Rigid vacuums that makes the perfect deflector after the brush is removed. It was a simple matter of removing the hose mount boss and inserting the deflector in the hole, leaving a perfect 2” male hose port on the outside of the vac.
Filter upgrade
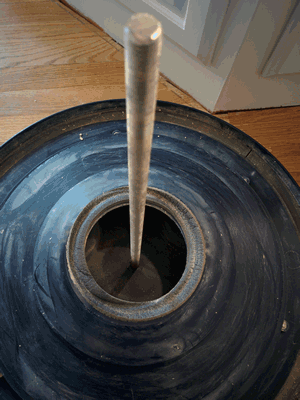
As for the cloth filter, it is as simple as cutting it off the plastic ring with scissors or a utility knife to get rid of it, oh and you can just ditch that cage thing too. I prefer a pleated filter like the ones the Craftsman/Rigid vacuums use, but there’s no way to mount one on this vacuum in stock configuration. First you’ll need to cut that grill away. Then remove the top section to expose the motors and remove the wiring from the switches and grounding posts. Next remove the plastic piece that holds the motors in place, set the motors and block off plates aside and take the base off and flip it over. Drill a 5/16” hole in the center of this base and tap it with a 3/8-16 tap. Acquire a 3/8-16 threaded rod and wing nut, cut the rod so that it’s long enough to screw into the hole you tapped and still extend out the hole in the top of the filter by an inch or so. Reassemble and install a pleated filter, I prefer the CleanStream HEPA filters for Craftsman/Rigid found in big box stores, they fit perfectly on the foam gasket.
Switches
This isn’t an upgrade per se, but one thing you will definitely encounter when running this vac is a bad switch. If you try to get one through your supplier you might end up paying a lot for original equipment. Bring your switch to a local hole in the wall electronics shop and have them match it up with one that doesn’t have that dust bubble thing on it. I was able to find them for $4 each, whereas they were around $40 each through the supplier(!) They could probably be found online inexpensively as well.
Motor upgrade
I haven’t actually done this yet but I don’t see why it won’t work. My plan is to add a third motor to this vac with its own cord so that all I have to do is run the second cord to another circuit, which will keep it 110v and won’t pop circuit breakers left and right. The challenge will be locating the isolation rubber for the motor, but I will update this article when I do it. I may even bump the hose size up to 3” too and hunt down a bigger filter. I’ll just cross that bridge when I get to it.
While this is a fine vacuum out of the box, with a few minor upgrades it can be improved upon quite a bit.